
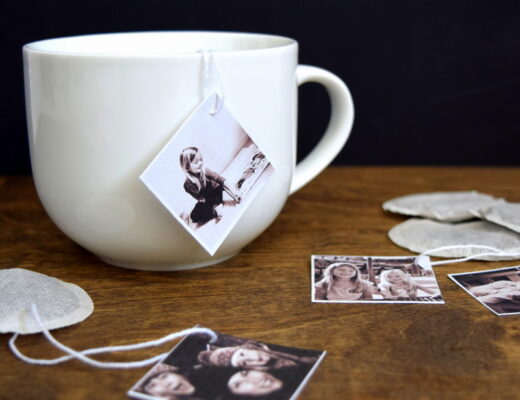
These Rustic DIY Thank You Cards were made because this past month my husband and me went away together for a belated Anniversary trip. For the first time in over 5 years – yes 5 years, that’s not a typo – we got away overnight for two whole nights to Blue Mountain.
My mom graciously offered to drive from my parents home (which is over a 3 hour commute) to watch the kids during that time. She wound up staying a week so we could get a whole bunch of overdue mini home fix up’s done as well. Believe me when I say a Thank You card is the least I could do for her.
How to make Rustic DIY Thank You Cards
Now knowing my mom, who is the type of mom to return Christmas presents I bought her as a teenager and then spend the money back on me, would ask me why on earth I would send her a Thank You card. She’d be the first to say “That’s too formal, what’s wrong with you?”
Yes she’s that mom. She feels it’s her civic duty to help. So I figured I’ll make the card anyway and then get my daughter to write in a Thank You to her as a Grandma Thanks for staying with me card. That way it’s “not from me”.
Because I was testing out the baking soda dough recipe for Christmas ornaments that we’re making this year, I got an idea to make some to use for these Thank You cards.
Here’s what I did and what you’ll need to do this:
- Baking Soda
- Cornstarch
- Water
- Cardstock
- Twine
- Yarn (your color choice)
- Mini screwdriver set
- Stamps
- Dye ink pad
UPDATED: For those interested in a Step by Step Tutorial on how to make the Baking Soda Dough ornaments, I finally wrote up a picture tutorial for them which you can find here.
I tested out making some dough ornaments using various cookie cutters – my daughter found the Easter ones. I am sure Bunnies like Fall too. Don’t even ask. And then I tried out stamping and writing on them to see what worked and what didn’t.
I actually wound up using my TEKTON metal stamp set to do the small letters and regular alphabet stamp set for the bigger ornaments.

I let them air dry overnight and they were still a bit wet on the back the day after.
If you do these I do recommend at least 2 days of drying time. You can bake them in the oven for an hour at various degrees depending on their thickness if you want them to dry faster.
I didn’t do this because if I can burn my fries there’s a good chance I’d find a way to set these on fire so I just let them air dry overnight.
TIP: Make sure to stamp your holes when the dough is wet and not dry.
I used a screwdriver from my mini screwdriver set. Then when they are almost fully dry, twist the screwdriver into the hole again to ensure a flush clean hole in the ornament.

I laid my ornaments on the card and marked where I wanted them to be tied to the card with my threads.

Poked the holes.

I then cut out 2 pieces of yarn and twine in equal lengths for my bow tie.
The hole in the ornament was very small and in order to get two pieces of twine/yarn threaded through it, I taped the ends of the twine/yarn together and cut the end diagonally.
This made it much easier to get the twine/yarn through the holes. I did this on both ends of the threads.
I then twisted the threads through the hole.
NOTE:
Do not push them through with a lot of force, because you may break your ornament.

Threaded the twine through the ornaments.

Repeated on the other side.


And then made several different versions because I couldn’t decide which one I liked the most.


These would make a great Christmas Card idea. Just make a dough ornament themed for the holidays, tie it to the card and then on the inside of the card add a small clear bag with ribbon or thread for the recipient to use to hang on their tree (just in case twine/yarn isn’t their thing). I like rustic but I have friends who make their Christmas trees look like a Swarovski Christmas Tree replica.
In this day and age where we get evites and text messages 24/7, sometimes it’s nice to turn back the clock to a more tactile time. And what better way to say Thank You than a hand made card to show your gratitude for those that took the time to help you.
31 Comments
Green Door Hospitality
November 14, 2012 at 10:47 amLove these! I am a big fan of snail mail and send a lot of cards throughout the year. The hearts are such a sweet touch!
Kenley
Leah
November 14, 2012 at 11:37 amI love “snail” mail! I am a HUGE fan of sending hand-written cards and these are absolutely adorable. I love the gift tags! Great job. 🙂
Gilit
November 14, 2012 at 11:42 amI love it! This is a great project to do with kids too
Kelly (Cobwebs, Cupcakes and Crayons)
November 14, 2012 at 12:59 pmThere is nothing like a handmade card. These are lovely, Alex. Thanks so much for being a part of The Thankful Edition!
Alex@northstory
November 15, 2012 at 3:48 pmBring on the Christmas one!!!
thethingaboutjoan
November 14, 2012 at 3:03 pmI think the salt dough hearts add just that little extra touch that makes a heartfelt handwritten thank you that much more special. What a great craft to do with kids! And I love the bunny one too!
Alex@northstory
November 15, 2012 at 3:50 pmI kept asking her why the bunny and she said she wanted to make a bunny ornament. Inadvertently we found the little chick cookie cutters which actually make for a pretty cool bird shape for the Christmas tree as well. So there you go! Easter cookie cutters for Christmas ornaments.
myhealthyohana
November 14, 2012 at 3:30 pmThese are just beautiful – I love how the hearts came out!! I like the combo of the twine and yarn, a little bit rustic with a touch of color. I’m really not crafty, but I think my daughter and I could handle this 🙂
Neaten Your Nest
November 14, 2012 at 4:53 pmThese are adorable! And you know whoever you send them too appreciates all of the time and effort. How cute!
~Erin
A Ponytail Kind of Day
November 14, 2012 at 5:57 pmI love this project, I may make them as napkin rings, thats for the great tutorial !!
Alex@northstory
November 15, 2012 at 3:50 pmNapkin rings! Now see if I actually hosted dinner parties that would be an awesome idea. Do it and blog about it! 🙂
Victoria Elizabeth Barnes
November 14, 2012 at 9:04 pmTotally adorable. They would make awfully cute gift tags too. And you could stick some rhinestones in there for your glitter-loving friends.
I am in awe, of not just your crafting skills, but your time management. Where are you finding the time for this magic? I’m actually serious. I want to do a DIY holiday craft post (because, I mentioned holiday DIY once and now am getting mad searches (12) for it.)
But, I do not even have children and am finding getting my act together to just do something simple and take photos is overwhelming.
Alex@northstory
November 15, 2012 at 3:58 pmI schedule it. I am not exaggerating. I blame my ‘project management’ skills on my previous job as a production manager where it was my job to schedule producers lives and camera crews and locations. I lived on my blackberry. So I make time to do this stuff and usually we do a whole bunch of crafts in one day and then don’t do anything for 2 weeks. I do NOT do this every day.
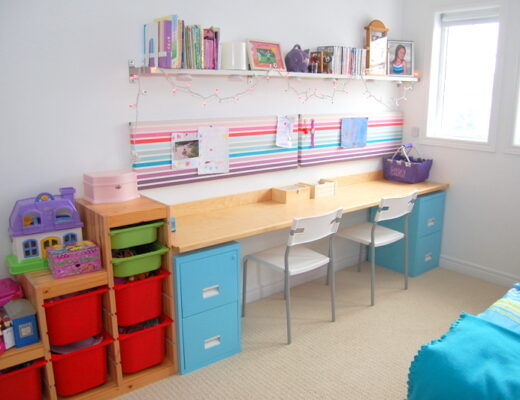
But everything else pays dearly for it though. When was the last time I wrote about a house reno or change (and we’ve done quite a lot this past while)…I can’t. Because my house is a mess. We have no rug. We practically re-did my daughter’s entire room and I can’t take any decent photos of it b/c it’s like a crazy interior designers studio in there right now. Cleaning? Who has time to clean? I can barely make dinner. But I craft with the kids, especially my older daughter b/c she’s home by noon from SK and instead of an afternoon full of “I’m bored” sometimes we do crafts. Like when we did this, I gave her her own batch of dough, a rolling pin and card stock and she made her own versions of thank you cards.
Taking photos is another insane matter b/c a lot of the time I have to wait until it’s a nice sunny day so I get good lighting in my kitchen (where I take most of my shots on top of my freezer against a white bulletin board paper stuck to the wall – how’s that for a glamorous photo studio).
I also like wine. A lot. That helps.
ScrapAndSalvage
November 14, 2012 at 9:06 pmgeez, woman, where do you get your energy?! 😉 great cards.
Alex@northstory
November 15, 2012 at 3:59 pmThere’s this wonderful wine called Fuzion. I think it’s better than Red Bull.
Organized Living Essentials
November 14, 2012 at 9:55 pmLove it! I have pinned on Pinterest on My Home: Tablescaping board because the possibilities with this delightful craft are endless. I so admire and respect your creativity. ~Thea
Alex@northstory
November 15, 2012 at 4:01 pmThank you! I think they’d look great for a Thanksgiving table. I’ve never actually hosted a dinner party. But a lot of that has a lot to do with my inability to cook to save my life. My husband likes to count how often I can set off the smoke alarm each day. I think the record was 3x. I hope you do them and they work great for you!
Organized Living Essentials
November 15, 2012 at 4:18 pmJust by reading your blog I am thinking you are very creative with a number of things. I am not sure if I will get to making it in the near future but I have pinned it and when time is more available, I can see it being such a great activity to do with great results.
~Thea
tradition is
November 14, 2012 at 11:30 pmvery nice and clean!!! I love it!
Pillows A-La-Mode
November 15, 2012 at 9:46 amLove and pinned! 🙂
Stacey
November 15, 2012 at 1:40 pmI just love a handmade card! What makes this so appealing to me is YES, it’s pretty, YES, it’s sweet… but I don’t have to throw it away ( I hate throwing away cards… I feel guilty!) Take that little heart off and hang it on your X-Mas tree or on your bulletin board or somewhere in your house or office that you could see it and remember not only the thoughtfulness, and the fun you had (watching the kids), but that being THANKFUL is something we should do every single day.
The options are endless with this idea. We should all be sending you one. Thanks, Alex!
Alex@northstory
November 15, 2012 at 4:01 pmUm, I should be sending YOU a bundle. In fact that’s a great idea…Thank You Stacey!
now at home mom
November 15, 2012 at 7:51 pmBeautiful card! I love it when I receive hand-made cards for any occasion, great idea! 🙂
Barbara Bamber | justasmidgen
November 15, 2012 at 9:22 pmWhat a great idea!!
Kate
November 17, 2012 at 4:09 amThese are just divine (as usual) – I love them! I’ve made ornaments using microwave paper clay which look similar but end up being obscenely expensive due to the price of the FIMO, so I will be trying these next time – thank you! The whiteness of them is beautiful and festive, and so hard to replicate with regular salt dough recipes. I have to say though that I enjoyed reading the comments almost as much – the insight into your life is hilarious and lovely… am now off to set up a photography studio on my own fridge-freezer… x
Alex@northstory
November 18, 2012 at 9:37 amThe first time I looked at clay at Michael’s I sat there staring at the tiny package thinking does that really say the price it does? This is way cheaper and per quantity you get tons of dough. That way you can make tags and necklaces and other things all at once. I figure if you use a gloss spray on them it may help to harden them so they won’t fall apart or crack as easily (thought I’ve got to tell you they hold really well when dry).
LOL! It’s true! We have a south facing home and we get flooded with daylight (helpful in cold Canadian winters, not so much in the summer) and the best spot in the house to take basic white backdrop photos is on top of my freezer along with a big huge white bulletin board I stick up behind it. That way I don’t have to pull out the flash and do as must editing in post. Try it, you’ll love it! It saves money on a big white canvas from a photography studio.
Sharon
November 26, 2012 at 8:43 amBeautiful and thoughtful. Thanks for sharing.
Melanie
December 1, 2013 at 11:31 amThis is great idea! Love it! Can’t wait to make the Thank you Cards. But where did you get the plain cards?
Alex
December 1, 2013 at 1:28 pmI actually used my paper trimmer and just used regular brown cardstock paper to make those specific ones (which I think I got at our local dollar store at the time) but I usually make my kraft paper cards with cardstock I buy at Michael’s. They have a really great selection of kraft paper. 🙂
Heidi
December 27, 2013 at 11:01 pmThese are terrific! We are waiting for the them to finish drying an extra day and then the kids are going to personalize them and give them out as thank you gifts for their Christmas presents. (: