
What do you do when you can’t find or afford the mirror of your dreams? You make your own DIY Farmhouse Mirror Frame. Now, if you’re new to my blog there are two things you should know about me.
1) I love and I mean love the look of natural wood grain. So I do a lot of crafts with wood. Because of this I have a very hard time painting over wood. Including the everyday boring Pine wood whose wood grain is taken for granted.
2) I also love the look of old wood, salvaged and upcycled wood. Old furniture made with this, bring it on.
What I don’t like about the salvaged wood decor is the price tag that often comes with it. If I could afford it you’d better believe I’d buy it. Some of my favorites are from Restoration Hardware and Hudson Goods. But with prices reaching $895, it’s like do I buy groceries for a month or get a mirror. Maybe one day when Lotto Max calls it’ll be a different story.
So what do you do until that day? You make one.
DIY – Farmhouse Mirror Frame
We started “renovating” our half bathroom on the main floor this past year after doing absolutely nothing with it for 2 years. By renovating I mean we had a really, REALLY tight budget and that meant re-using things and splurging only on a new faucet.
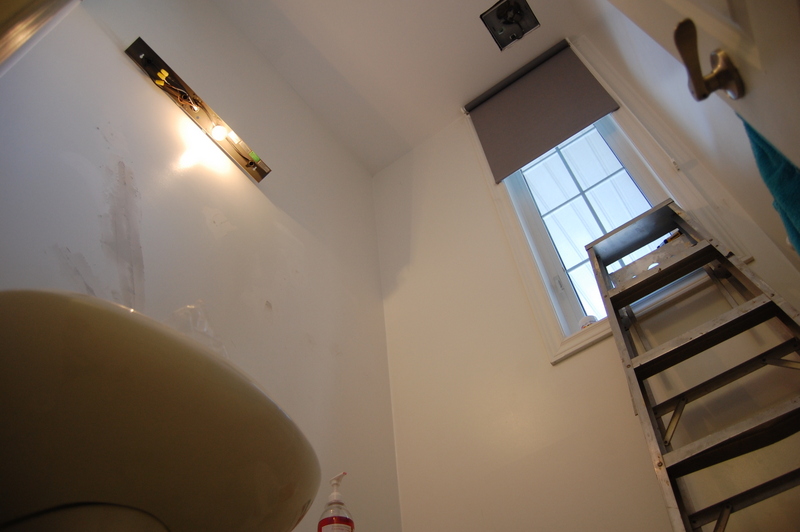
It looked like this during the process. I’d like to tell you it was somehow different before, but honestly if you take away the ladder, it was pretty much the same room.
Actually the nail holes in the walls were now covered so this was an improvement.
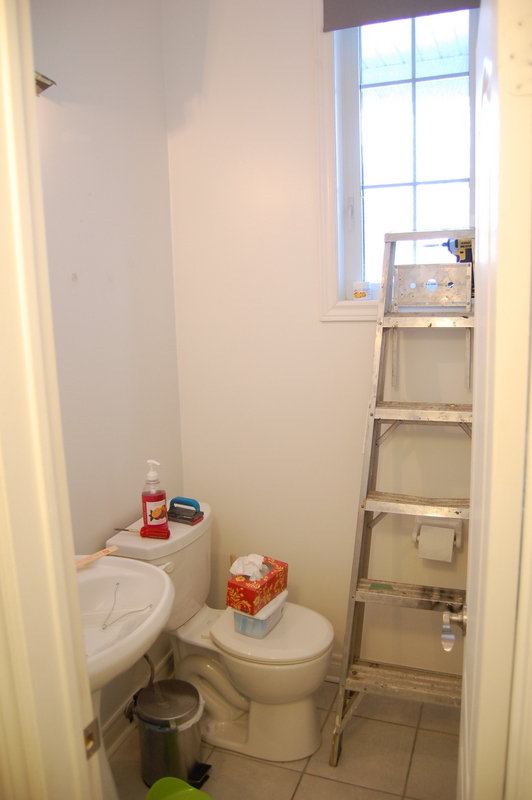
First thing we did is paint it – by we I mean my husband – Twilight Grey by BEHR.
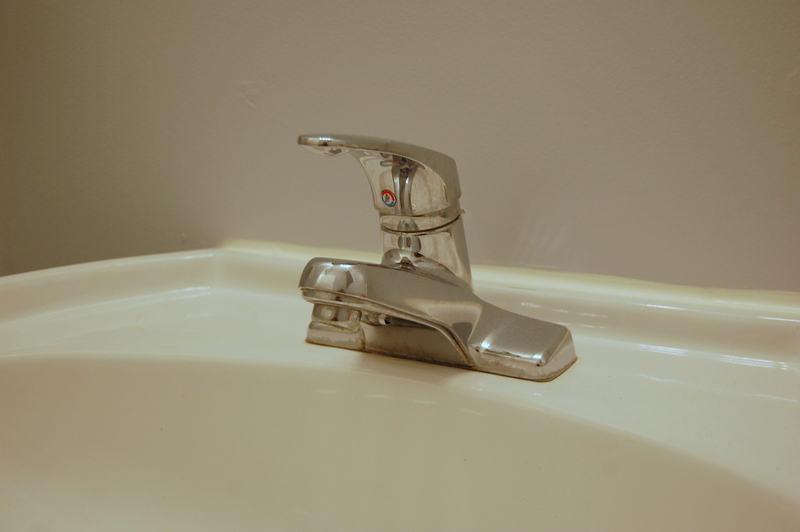
Then we took out this old faucet. Again by we, I mean my husband.
And thanks to a great sale at Lowe’s, picked up the Jaida faucet by Pfister.
We love this one so much I am trying to find a comparable kitchen version.
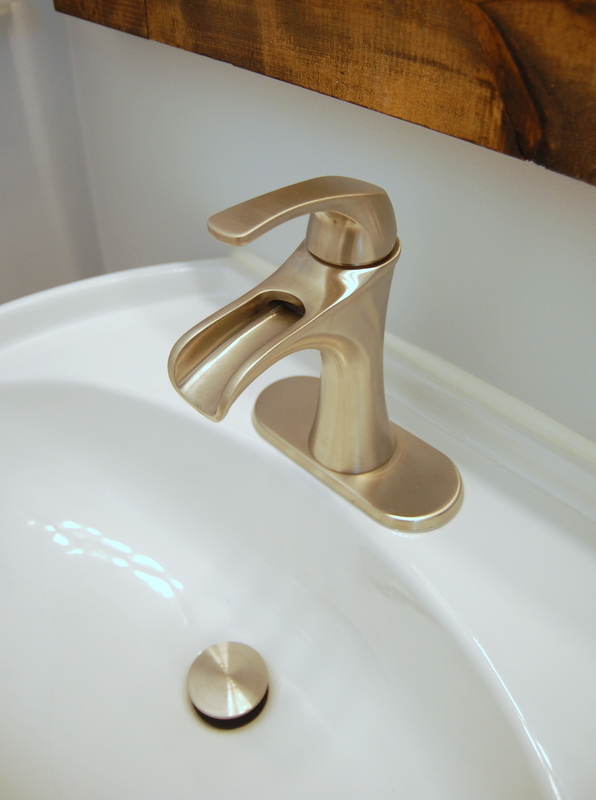
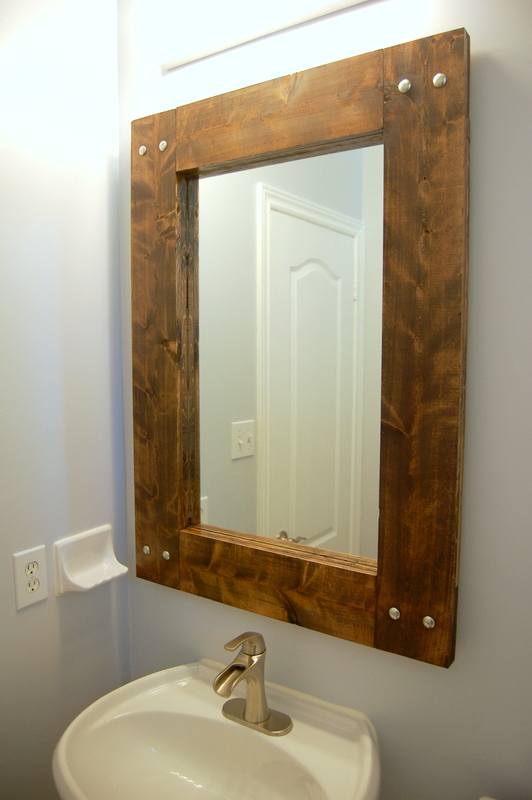
Oh wait, what’s that nice warm wood thing above the faucet?
That’s the idea I got into my head and said, “Hey James want to make me a mirror frame?”
This bathroom is an extremely tall, narrow bathroom with 11 foot ceilings. It needed something to draw the attention away from the wasted space overhead. A good mirror could do that.
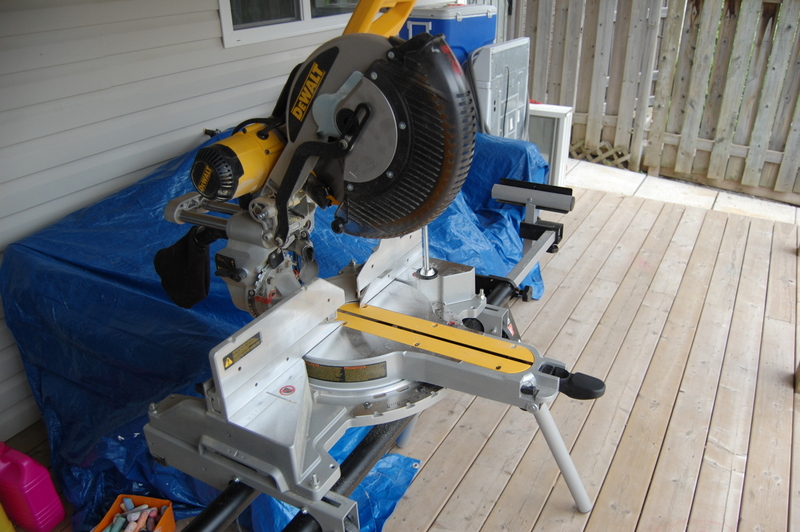
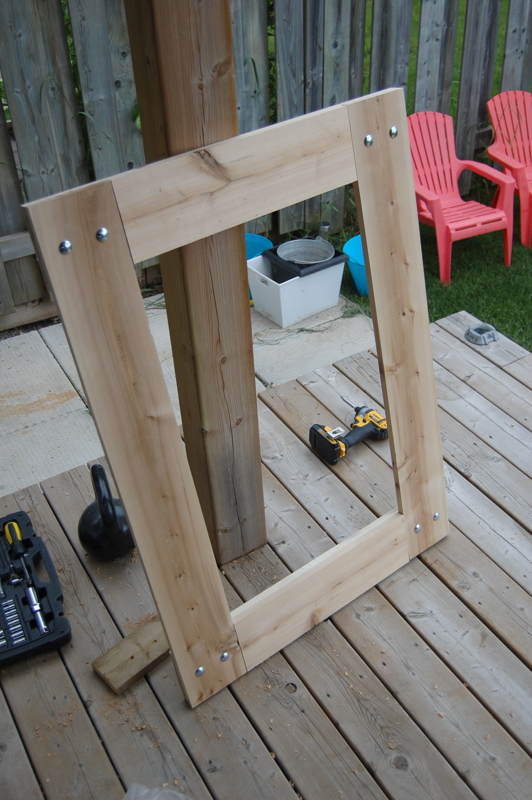
So after my husband finally got himself a nice Father’s Day treat at Lowe’s – aka the DEWALT 12″ Double Bevel Sliding Compound Miter Saw (they also had a seriously good sale on this one that weekend and this was something that we really needed for the basement renovation) – it was time to build the frame for it.
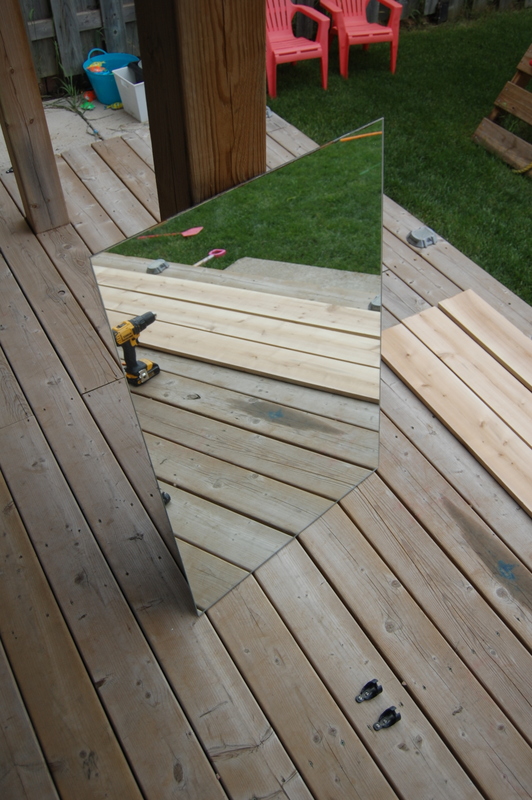
We started with this, our sexy old bathroom mirror.
Yes this was on our wall. Don’t be jealous.
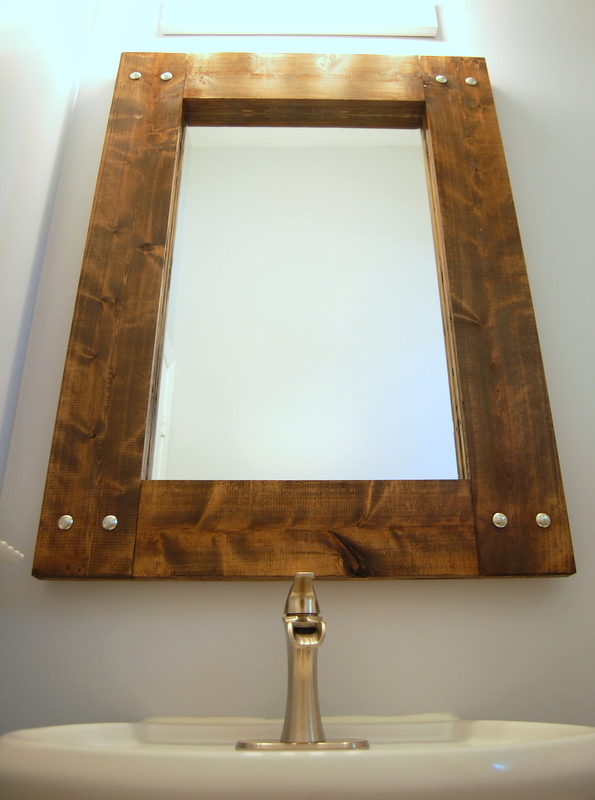
I had this vision of a rustic, farmhouse style mirror that looked like it had come off of a steamship. Because you know, boats and farms are the same thing. Don’t ask. I had fallen in love with the nautical porthole mirror look. Except I needed it in a rectangular shape.
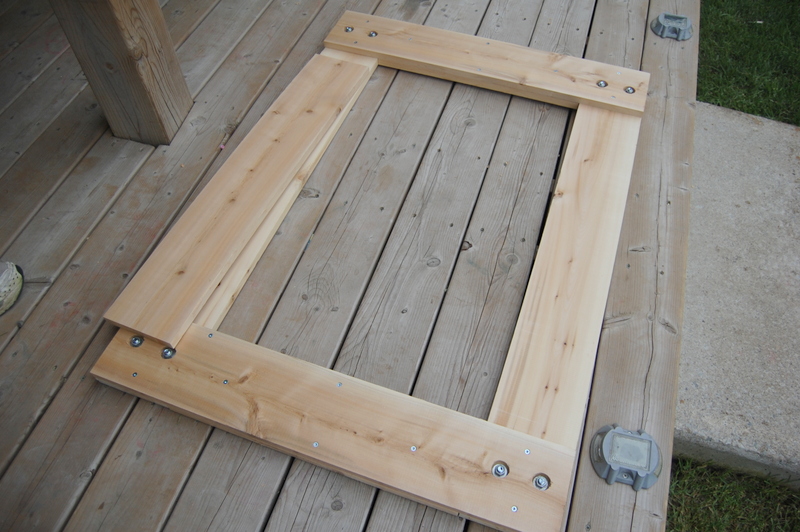
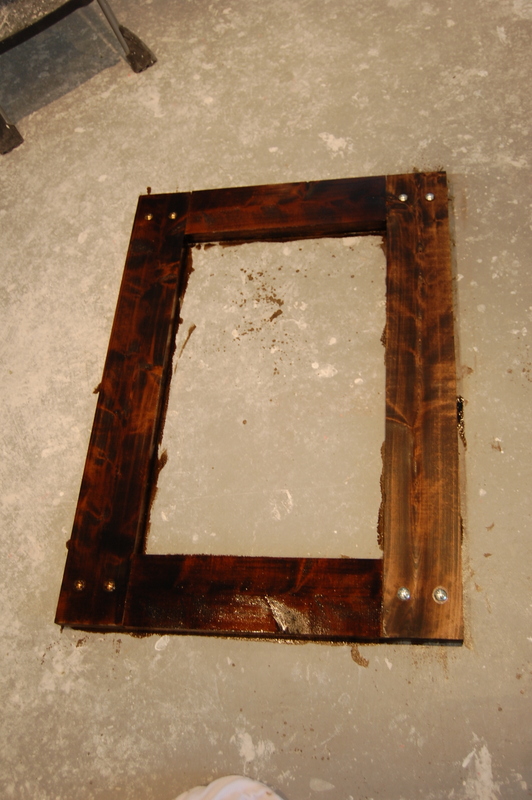
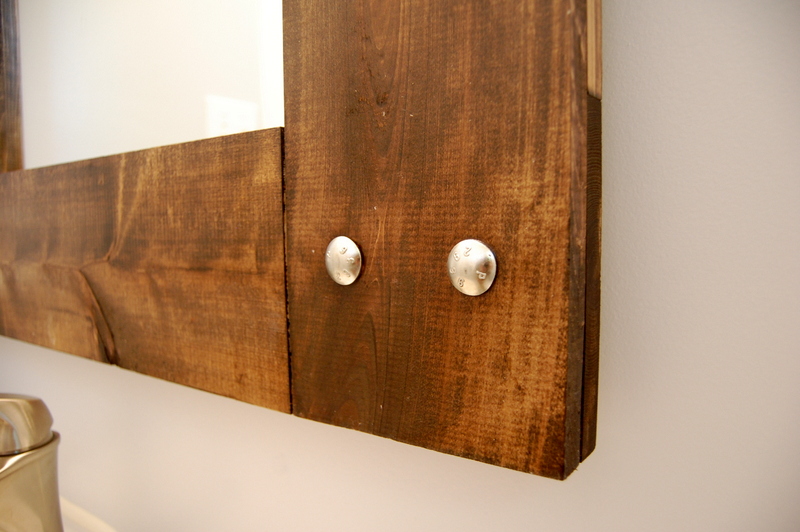
In which case we picked up some cedar wood and carriage bolts to add to that look.
Folks, carriage bolts are the best!!!! It takes your DIY farmhouse mirror frame from average to oh what’s that?

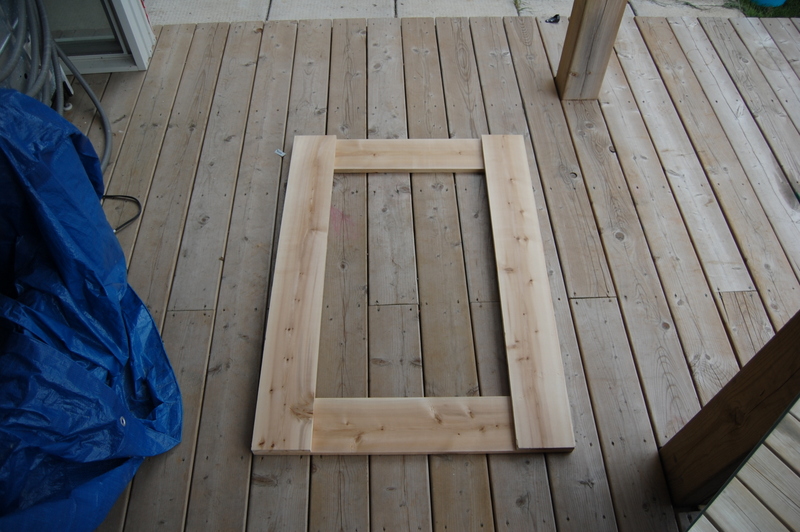
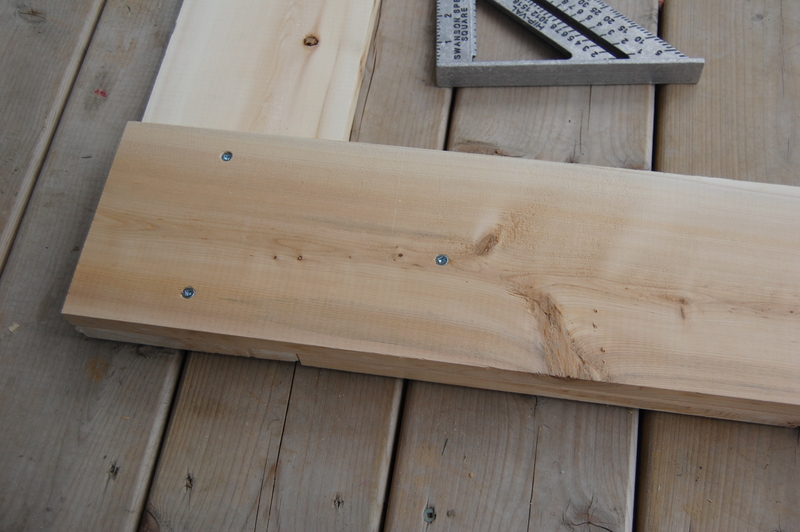
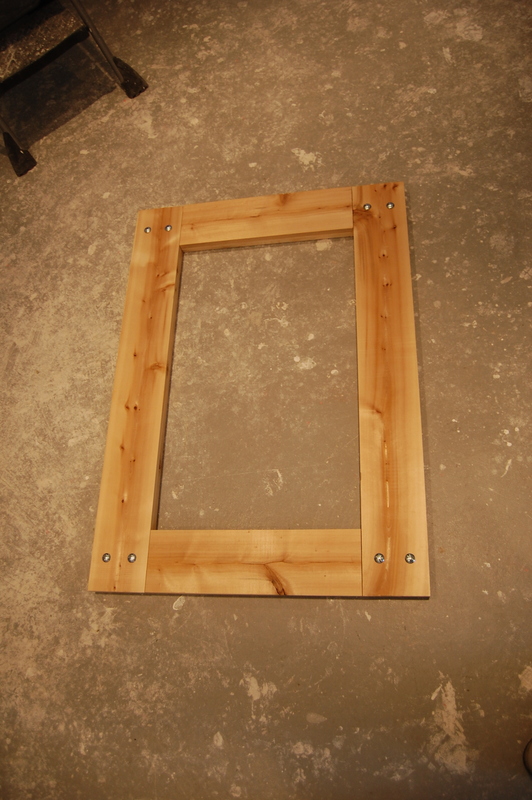
Started with a simple frame with straight cuts and tried to use LePage premium construction glue to glue the two boards together.
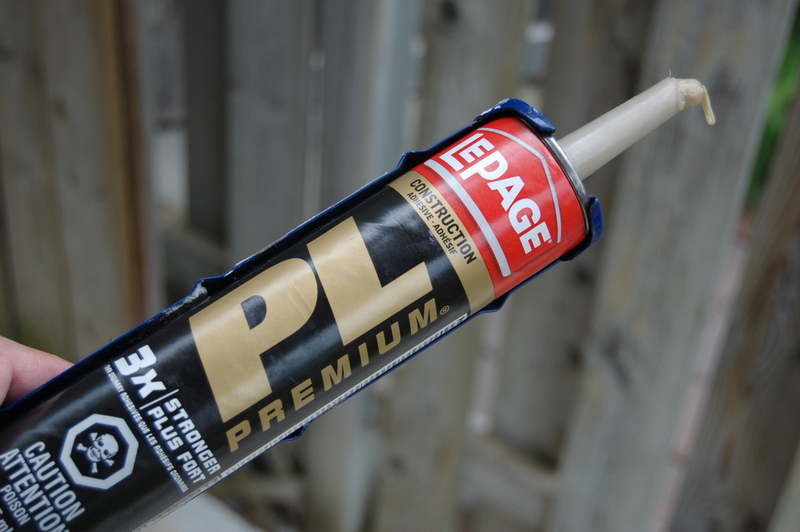
Let’s file that under it seemed like a great idea at the time.
Normally LePage works really well and we’ve used it countless times before, but for whatever reason (most likely the slight wavy shape of the wood mixed in with the humidity going on outside) it would just not glue together, even after we sat our kettle bells on the wood to weigh it down.

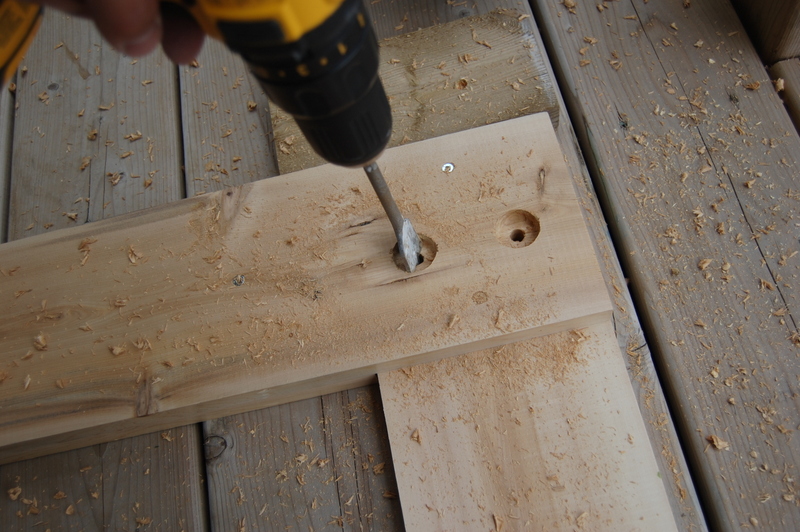
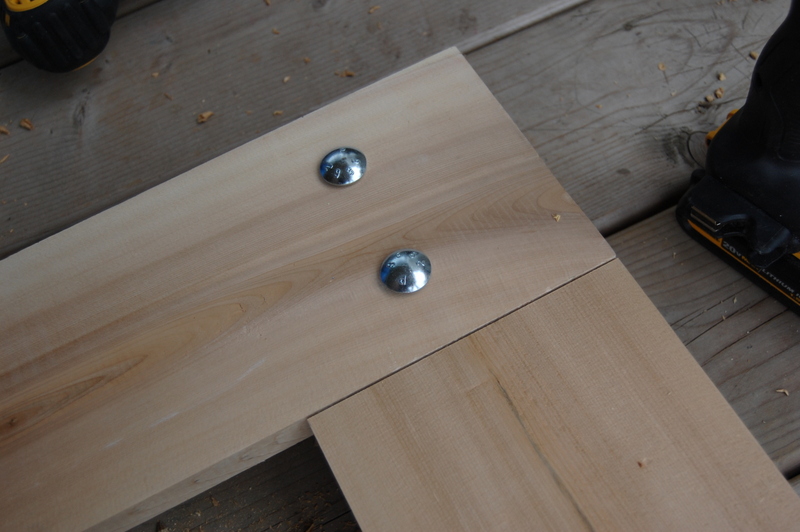
So we went back to securing it together the old school way on the backside of the frame with screws.
Then it was flipped over to the front side and a smaller piece of wood was glued to the center. That held no problem.
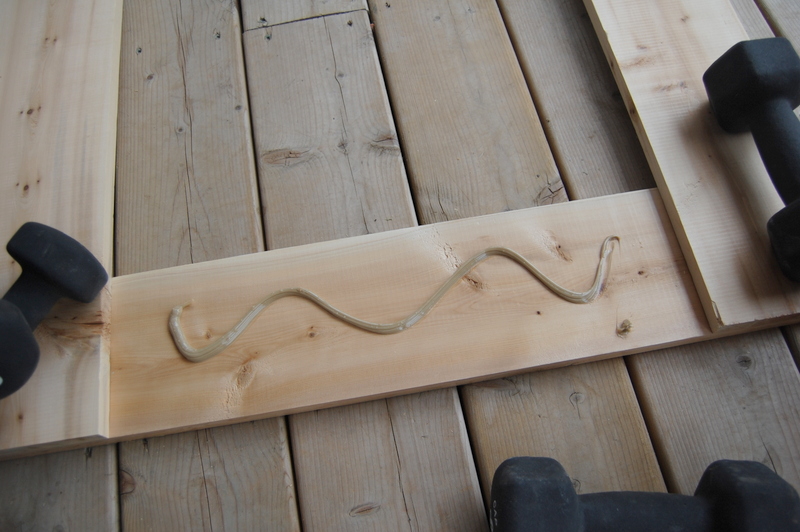
Notched out some holes for the carriage bolts and put the pieces of wood together.
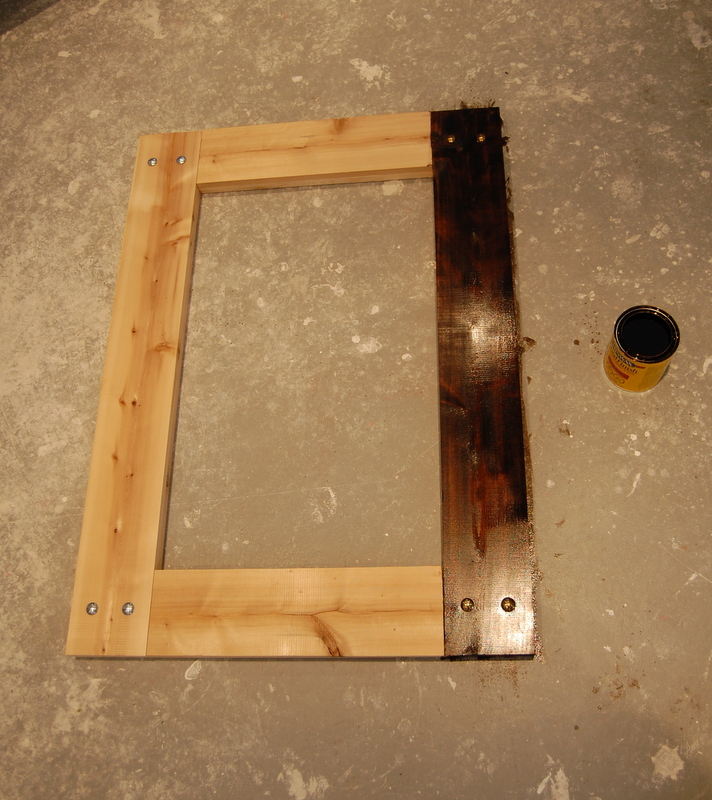
We went back and forth on whether or not to whitewash the wood frame or do a dark aged look.
It’s one of those things that when you’re standing in the bathroom and looking at the paint colour, you realize that it needed a warm piece of wood. Had the frame been done in white within that room, it would have looked all kinds of wrong. And felt very cold.
So we used Minwax Dark Walnut to stain it.
This was 10 mins left on and then wiped off.
Then we used a coat of Minwax Polyurethane to seal and protect it.
It took almost 3 days to dry in our basement.
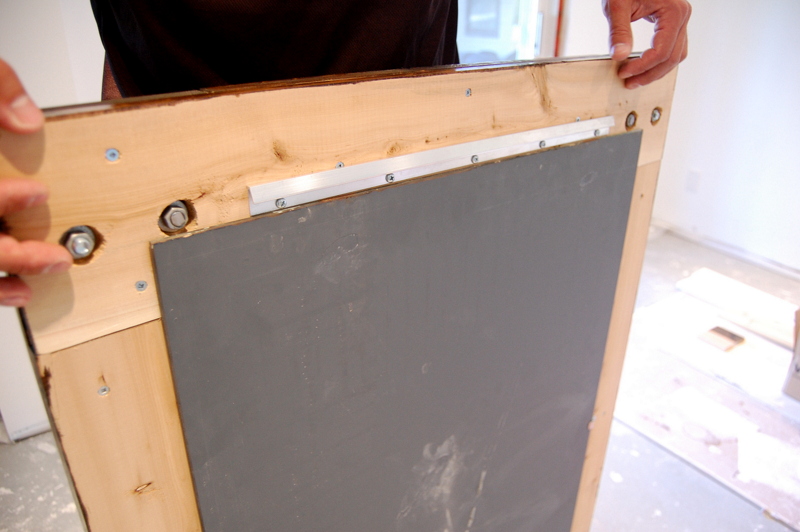
For hanging a mirror/frame that now weighed a lot, we used the Hangman French Cleat picture hanger and then basic mirror hooks to attach the mirror to the frame. The version we used can hold up to 200 lbs but this mirror is not 200 lbs.
And welcomed it to its new home.
A fancy DIY farmhouse mirror frame with carriage bolts, for a lot less money than you’d find at major retailers.
Next up in the bathroom renovation, filling this empty wall space with some decor and storage.

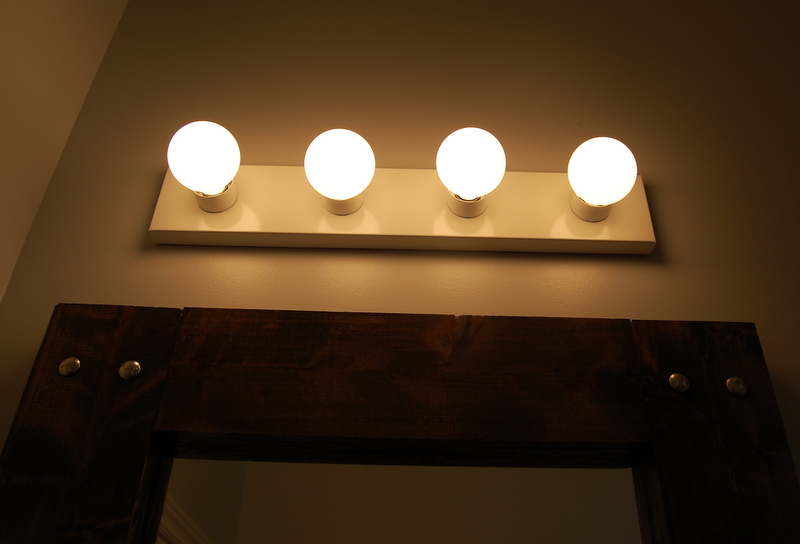
And oh yeah. This light needs a hell of a makeover.
48 Comments
Alex - Hydrangea Girl
June 24, 2013 at 10:56 amWhen I first saw the stained wood, I let out an audible gasp. That looks so hot stained that deep. It picks up on the grains so well and really does give it an old shippy type feel.
Spot on.
Alex
June 24, 2013 at 7:23 pmI’m telling Alex (Great name BTW) we went back and forth on it. Whitewash, stain, whitewash, stain. The stain won. Wait till I get at the lights. Ugh. Bar Light.
Stephen Hughes
June 24, 2013 at 11:21 amI feel a DIY Book coming on….
Most of it’s written (in you blog)….
….. so what’s stopping you?
Alex
June 24, 2013 at 7:23 pmStephen coming from someone as talented as you with wood crafts, that’s crazy talk!!
Pfister Faucets
June 24, 2013 at 11:24 amThe DIY mirror looks fantastic with the Jaida – you did a great job. Glad you’re enjoying it. Hopefully we can find you a kitchen faucet you love just as much.
Alex
June 24, 2013 at 7:26 pmWe LOVE it! My fav part is the plug in drain (outside of the farmhouse aesthetic of it) b.c I don’t have these little caverns around the back to clean around the drain lever with a toothbrush. It’s the idea of splurging on the one or 2 items to make or break a room. This was it.
We’re doing the kitchen and a wet bar in the basement that are going to need faucets. Almost done the basement, then the wet bar prep starts. I’ll definitely be looking for one for both.
Gilit @ Shoes Off Please
June 24, 2013 at 12:24 pmLove love love the faucet and what was that? You wanted to make me a wooden mirror for our bathroom? Okay, if it makes you happy I won’t say no.
It’s gawjus!
Alex
June 24, 2013 at 7:27 pmHAHAHAH! I’m so telling my husband.
Victoria • Restoring our Victorian
June 24, 2013 at 1:26 pmLOVE! Especially the bolts!!
p.s.- I think bathrooms so hard to photograph!
Alex
June 24, 2013 at 7:28 pmI love how you said that b/c I swear to you, that bathroom lighting nearly killed me trying to take decent photos of the room. It faces north. No sunlight goes in. I was at the lighting mercy of the shades of daylight meets an 80’s bar light and no corner to do a wide shot in. So painful.
jackie
June 24, 2013 at 5:57 pmIt’s beautiful! Love that chunky frame with the big ol’ bolts. Love that faucet too! We’ve had plans for a bathroom reno going on 4 years now. Toilet and vanity have been in the garage all this time. I’m sure when we finally do it the vanity will be so outdated I won’t even like it anymore!
Alex
June 24, 2013 at 7:30 pmLOL! I have items like that too. I save them hoping to use them for a future project and by the time I get around to using it I wind up donating it to a thrift store.
[email protected]
June 24, 2013 at 7:27 pmThanks for posting this! We’re currently working on our hall bath too. Everything’s painted, the shower door removed, and we just caulked certain areas today. We have a mirror in our garage for the hall bath. We were talking about what kind of frame we want around the mirror today. We know we want it to be a rustic look, but we’re still going back and forth. It’s nice seeing yours because it gives me a perspective of what ours would look like with a rustic stain. I’ll be showing this to my husband. Thanks again!
Alex
June 24, 2013 at 7:31 pmAnytime Autumn! Initially it was supposed to be a whitewashed stain but the dark really helped the space. It’s one of those things that you have to feel for in your space with your wall colour. Half of me could have left it pine and it still would have been ok!
Christy
June 24, 2013 at 10:27 pmWow, great project! I, too, am a lover of all things rustic, reclaimed, etc. and I love how “natural” this mirror looks. Now to get the inspiration to try something similar myself (because I definitely hear what you’re saying about the hefty price tags!)
Alex
June 26, 2013 at 7:06 pmI love old things and upcycled things but they’re so far beyond my wallet at this point. I figure if you can try and make it, why not?
Neaten Your Nest
June 25, 2013 at 11:06 amIt’s gorgeous! You all did a great job and thanks for the tutorial! I love the wood with the faucet, it brings rustic and contemporary together perfectly!
~Erin
Alex
June 26, 2013 at 7:08 pmI am seriously in love with the faucet. It’s like that farmhouse water pump feel to it. Anything to draw attention away from that current light is fine by me!
Kelly (Cobwebs, Cupcakes and Crayons)
June 25, 2013 at 11:44 amThat came out great, Alex. I love how the stain looks next to the paint color you used..
Alex
June 26, 2013 at 7:08 pmThank you Kelly! I wish I could have gotten a better shot of the wall colour. The current lightning in there isn’t do me any favours.
paula schuck
June 25, 2013 at 11:56 amOh my gosh I am flipping. I love that stain. It’s my favourite shade ever!! I am so jealous of that faucet. Your pictures are gorgeous and you are super talented. Nice job!!
Alex
June 26, 2013 at 7:09 pmThanks Paula!! It’s amazing when you google it how popular of a shade it is b/c it’s so user friendly.
Danielle
June 25, 2013 at 1:50 pmWe have two vanity mirrors sitting in our garage that I have been wanting to frame in and hang in other parts of our home. I was leaning toward white trim molding, but i LOVE the rustic wood. Like LOOOOOVVVVVVEEE it!
Alex
June 26, 2013 at 7:10 pmPeer pressure. DO IT!!!! I say go for white if you like it. It’s honestly what we originally wanted to do but it just felt off in our bathroom. I think a mirror like that would look awesome in white trim.
ScrapAndSalvage
June 25, 2013 at 6:56 pmlove the nice, rich color! well done!
Alex
June 26, 2013 at 7:10 pmThanks Tamara!~ 🙂
Bewildered Bug
June 27, 2013 at 7:38 pmI am loving the Pfister faucet and the colour of that stain! Awesome job!
Pfister Faucets
June 28, 2013 at 9:12 amThanks Serena!
now at home mom
June 28, 2013 at 9:14 pmGorgeous! Gorgeous! I love it! you did a great job with this one! 🙂
& wow! 3 days to dry but it was worth it!
Alex
July 1, 2013 at 11:05 pmI was surprised at how long it took to dry too b/c I’ve used it before and it was done way quicker. So I think it was the environment – being in the basement vs in the garage.
April
July 1, 2013 at 8:30 pmlove it!!!!!
Alex
July 1, 2013 at 11:06 pmThank you! I was inspired to start decorating our half bath due to oh someone’s awesome bathroom makeover…
Lauren @ The Thinking Closet
July 15, 2013 at 11:45 pmHa ha. I chuckled throughout this post because I felt so similar writing up the IKEA hack. So many “we” sentences really were all about the hubster with the drill. 🙂 This frame turned out fantastically though, my friend. From the stain to the bolts to that freakin’ awesome faucet (I’ve never felt very enthusiastic about faucets in general, but THAT one brought out the enthusiasm in me). Brava, my friend!
Christina @The DIY Mommy
July 2, 2014 at 5:47 pmLove this mirror! Thanks for sharing!
Alauna Anderson
July 9, 2015 at 12:10 pmWhere did you get your light blue bedspread featured in your pinterest picture with the DIY rustic mirror? I love it!
Alex
July 9, 2015 at 7:49 pmSadly that is not my project. I’ve contacted Pinterest many times and asked them to remove that image as someone pinned it and it somehow wound up leading to my DIY mirror. But that is not my project or bedroom photo. Sorry I can’t be of more help.
justaircompressor
January 20, 2016 at 11:15 pmLove the barn door. I am fascinated by the industrial look and then when you put it with a little country it really is awesome. Thank for sharing.
dawn
May 18, 2016 at 12:36 pmHi there-
That planter next to the mirror is amazing. Is that one of your DIY’s? Where could i find that???
Allyson
September 17, 2016 at 12:52 amHey! I was just wondering where you got your actual ‘mirror glass’? I’ve never bought it separately so I don’t even know where to begin
Alex
September 17, 2016 at 1:37 pmThat was on our wall from the original house builder but you can easily buy some at any major home improvement store like Home Depot or Lowe’s. Amazon has them as well. Just search for a Frameless wall mirror and choose the size that you need.
Nicolas
May 15, 2017 at 4:12 amLooks very cute! Nice rustic mirror. How long did it take you to make this one?
Alex
May 23, 2017 at 3:40 pmMy apologies on not reply sooner. This frame itself took less than a couple of hours but the staining took a lot longer, just mainly due to how long it took to fully dry and cure.
Christina L Jenkins
June 27, 2017 at 10:17 pmHi, was just wondering what size wood you went with. The dimensions and thickness?. Thanks
Alex
July 5, 2017 at 9:52 pmHi Christina! We no longer live in the house that has that mirror (the new owners asked for it in the sale of our home). So I apologize but I can’t remember. My husband *thinks* it was 2 x 4 or a 2 x 6. I know. That’s about as helpful as a guess. I am really sorry! I do miss the mirror and keep bugging him to make us a new one.
Faye Rockswold
September 12, 2017 at 5:33 pmJust wondering what you used to hang the mirror on the wall.
Alex
September 12, 2017 at 7:03 pmMy husband (who hung the mirror) said there’s another part to the kit that you mount to the wall and it hangs onto that part.
oakfurnitureking
October 9, 2017 at 6:49 amI love this post, cannot believe you made creating a mirror look so easy! If I wanted to buy a mirror like this in the UK, where would you recommend?
Alex
October 9, 2017 at 11:14 pmI wish I could point you in the right direction but I am so unfamiliar with what shops are open there that would sell a similar piece. Definitely do a quick Google Search for UK decor blogs and you’ll find a list of great ones that would suit this particular aesthetic.